No matter what method you choose, it is always a good idea to truss a bird - pure and simple. The only real exception would be if you plan to butterfly or spatchcock it before cooking. Untrussed legs on a whole bird may gape away from the body or even fall off, while the drumstick and wings stick up and dry out… need we say more?
What’s Good for the Goose...
As with many cooking techniques, there are several types and styles of trussing, some suited to particular types of fowl.
- Since turkeys, capons and chickens share similar physical attributes, the same types of trussing and roasting methods will do for all of them.
- Geese and ducks on the other hand, have a narrower body and thicker skin with an abundance of good fat, which requires different trussing and roasting altogether.
- Smaller birds the likes of game hens and squabs need trussing only enough to bind the legs.
First Things First
Regardless of the technique you choose, a few things need to be done beforehand.
- First, remove the neck and gizzards and reserve for making stock or stuffing.
- Next, take a good look at the shape of the bird. Trussing will give you an opportunity to slightly cinch up the breast, causing it to round out nicely. You can also bone the bird to varying degrees, from removing just the wishbone to a full glove boning.
- Next, the bird will be seasoned and prepped according to your recipe.
Make a Wish
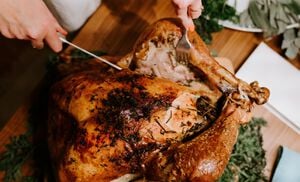
To make carving the breast easier, and neater, remove the wishbone before trussing. It allows your knife to travel further forward and straight down the breast close to the ribcage without obstruction, which is a great help if you plan to carve at the table. To remove the wishbone, place the ‘empty’ bird with the breast up and towards you. Slip your index finger and thumb under the neck skin, and pull it towards the back of the bird until you are able to locate the exposed wishbone with the fingers of your free hand.
Continue to hold the skin back, and use the tip of a small, sharp knife to cut between the bone and flesh. Start at the top and follow the visible contours of the bone down along both sides until reaching the base. Now that the bone is free except at the ends, hook your index finger under the crotch of the bone and pull it out. Release the skin, pat it back in place, stuff the bird, and continue with trussing before cooking.
Sew, a Needle Pulling Thread…
One traditional trussing method employs a very long trussing needle threaded with kitchen string. This time-honored technique is used to sew up the tail vent, as well as run string through the bird from side to side to complete the binding. Another wonderful technique uses only a single length of kitchen string, a few simple, fluid movements, and only three knots tied along the way. If you plan to carve the bird in the kitchen, or discover you only have a short length of twine, you can also secure the neck flap to the turkeys back with a few well-placed toothpicks, and bind the bird’s legs, neatly crossed at the ends, with your string.
QUICK TIP
Some of our birds come with the legs held together naturally by a band of skin. However, for superior roasting, trussing the remainder of the bird is required. If you damage or stretch the band while handling, and the band does not hold the legs together snugly, truss the entire bird properly, and use the band only to enhance presentation.
Related Products


Starting at
$72.99
- White Broad-breasted hybrid breed
- Turkeys are humanely raised free-range with access to the outdoors
- 100% organic, non-GMO, all-vegetarian grain diet of corn and soy, and pure spring water without chlorine or fluoride
- No animal by-products in feed
- No antibiotics, growth hormones or arsenicals are ever used
- Giblets Included
- Raised on small-scale Midwestern farms in the USA – not factory farms
- Farm-to-table audit trail
- Farmers support sustainable agriculture and preserve the natural ecosystem
- Ships in an uncooked state
- Product of the USA
")
")
Starting at
$159.99
- 100% natural, farm-raised heritage turkey
- Slow-growing Narragansett and Bourbon Red breeds
- Grain feed of non-GMO corn and soy
- No antibiotics or hormones
- Free-range; turkeys forage outdoors and have the ability to fly
- Air chilled for best flavor and no retained water
- Hand processed
- Giblets included
- Ships in an uncooked state
- Product of USA
- Note: There may be small pinfeathers in the flesh, which are easily removed with needlenose pliers, tweezers, or your fingers


Starting at
$99.99
- Humanely raised on small family farms
- Surgically, not chemically, caponized
- Free-ranged, with natural light
- All-vegetarian grain and corn diet, pure spring water
- No hormones, no growth stimulants
- Raised to 12-14 weeks of age
- Hand processed to assure quality
- Farm-to-table audit trail
- Sold in an uncooked state
- Product of USA